Find out
Some of the most useful and under-used features available in modern word processors involve the automatic maintenance of indexes and tables of content.
Such features are especially valuable in large documents which undergo many revisions. These facilities cannot be covered in a comprehensive manner in the space available here, but an introduction is provided to help you begin to explore their potential.
It is easy to create tables of contents showing each heading, together with the page number on which it appears. This assumes you have used appropriate styles for the headings in each section (and subsection) of your document.
Creating Table of Contents
To create a table of contents:
- Move your cursor to the point at which you want to insert the table of contents
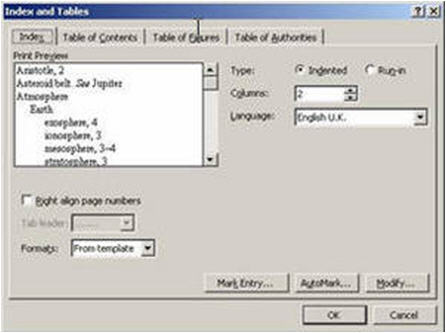
- To generate the contents page, select Index and Tables from the Reference section of the Insert menu
- Select the Table of Contents
- Select the format and number of levels you want to have to determine the depth of headings to display.
- Experiment with the other settings, and use the Options button, to find the best layout
- Click OK to confirm your selections and build the table
The table of contents will appear in a grey box which indicates that it is a field controlled by Word, rather than text which has been manually entered.
Updating Indexes or Tables of Content
For updating the Index or Table - for example after having translated the document:
- Move your mouse over the grey area and click once with the right mouse button
- Use Update Field from the context menu to prompt Word to update the table of contents.
Building Indexes
The process of building indexes is more time-consuming. This is because entries to be included in an index must first be selected. This can be done manually or by using a file containing a tabulated list of terms and the index entries under which they should appear.
To mark an entry manually:
- Select the text to which an index entry will refer
- Then select Index and Tables from the Reference section of the Insert menu
- Select the Index tab and press the Mark Entry button
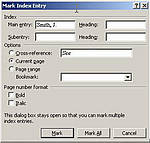
- The Mark Index Entry dialog box will open
- The text in the Main entry and Subentry boxes does not have to be the same as that which appears in your document
- If you click in the Main entry box, while text is highlighted, your selection will appear in there
- You can type something else instead: For example, if "Smith" appears in your document but you want "Smith, J." to appear as your index entry, type "Smith, J"
- If Smith is to have an entry of her own, her name should go in the Main Entry box
- If she is to appear along with other members of a group, the name of the group might appear in the Main entry box, with Smith’s name as a Subentry
- This is enough information for a basic index, consisting of a list of entries with page numbers
- Once this is done, press either Mark or Mark All
- Experiment with the other settings if you wish
- The dialog box will remain open to allow you to add more entries.
- Press Cancel to close it
The second method is useful when you want to build multiple indexes of the same terms. You will need a concordance file upon which to base your index. This file will be a Word document containing a table (see section 04. Tables for more on creating tables).
This table should have two columns. This first column will contain the text to be marked; the second will contain the entry to appear in the index. This allows you to index variants of a word or name under a single headword. If subentries are required (see above), simply use a colon to separate the levels thus: mainentry:subentry. Each piece of text to be marked will have a row in the table. Once you have finished, save your file.
Building Indexes based on existing files
To build an index based on the file you have created:
- Select Index and Tables from the Reference section of the Insert menu
- Make sure the Index tab is selected
- Press AutoMark
- Open your file using the Open Index AutoMark File dialog box
- Once you have marked your document for entries, you can create the index
- Move the cursor to the point at which you want to insert the index.
- Select Index and Tables from the Reference section of the Insert menu
- Make sure the Index tab is selected
- Press OK to insert the index
- Experiment with the various settings to control the presentation of the index
- Note that by default your index will have two columns. This might look strange if you only have a few entries
Why is this information important for translators and translation teachers?Knowing how to handle indexes and tables in documents which need to be translated is very important for translators because they should not translate or manually edit these fields.
After having translated a document containing e.g. an index or a table of contents, translators will have to update the Index or Table of Contents as described above. In this way, the headers and page titles will appear already translated in the indexes and tables of contents as they are in the different chapters or sections of the document.


