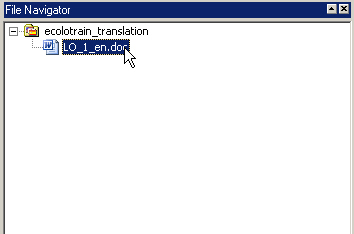
After having completed the project definition, you will see on the right hand side of your screen the File Navigator window listing the name of your project and the source file(s) belonging to this project.
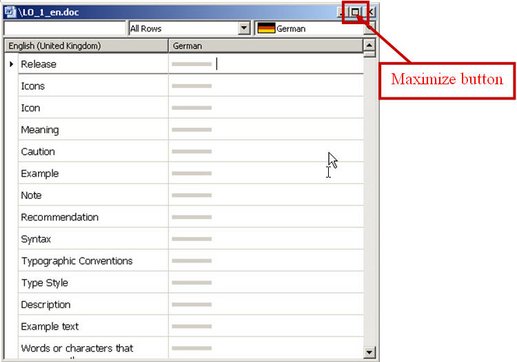
- Double clicking on the name of the file you want to translate opens the editor window of DéjàVu X with the source text in the first column and an empty column for the translation. Click on the Maximise button on the upper right corner of the editor window, in order to maximise it.
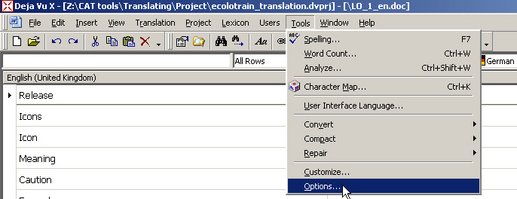
- You have to set up your DéjàVu X system to support an efficient way of translating your text. Open the Tools menu and choose Options.
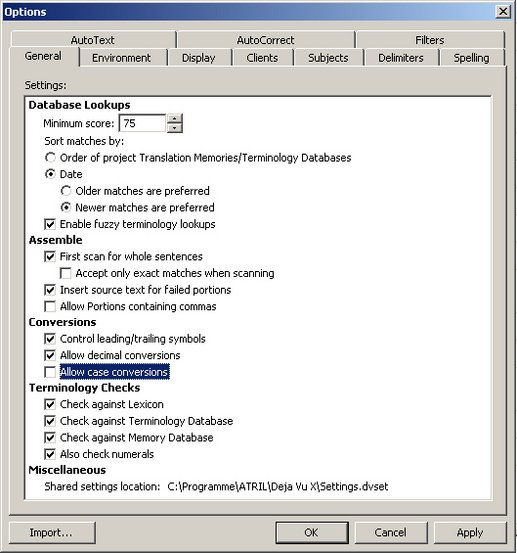
- The Options dialog box opens. In the General tab you should set the options as shown in the screenshot below. The meaning of the options is:
Database lookups: here you can set the minimum fuzzy match value (default 75%), the order of lookup in TMs and termbases, preference for older or newer matches if more than one match is found for a segment, or enable fuzzy terminology lookup, which is necessary because you want to find not only exactly identical terms but also e.g. inflected forms.
Assemble: to assemble translations from portions for segments which have no exact or fuzzy match in the TM, that is to combine results from both terminological and translation memory databases within one segment. You can also specify for DéjàVu X to first scan for whole sentences before assembling and that the source text shall be inserted for the portions which are not found in the termbase or TM.
Conversions: here you specify whether leading or trailing symbols (e.g. spaces, punctuation etc.) are controlled by the system and whether you want to allow conversion of number formats (e.g. between English and German/French ) and conversion of cases (i.e. convert the case of target word to the case of the word in the source text, which is, of course, not very helpful for translating from English into German).
Terminology Checks: in this part of the dialog just select all options, although we do not use a Lexicon in our exercise. Terminology will be checked against all possible sources containing terminological information.
The last setting in this dialog is showing the location of the file in which all these settings are stored on your computer.
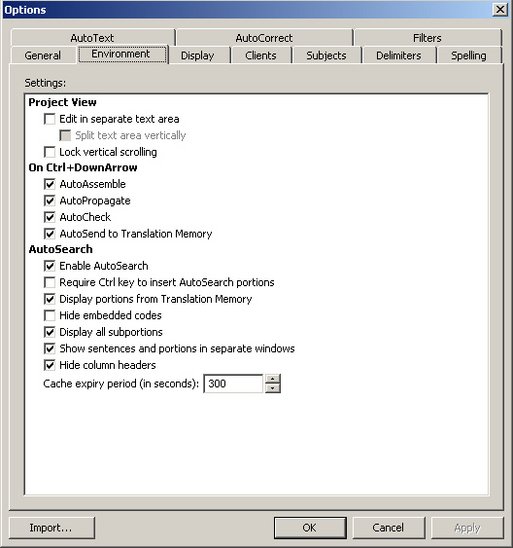
After having made these settings go to the Environment tab in the same Options window and set the environment settings as shown in the screenshot below. The most important of these settings are:
- On Ctrl+DownArrow: here you specify the actions to be taken, when pressing Ctrl+DownArrow in any translation segment:
AutoAssemble: assemble a translation from portions of a segment found in the TM or termbase
AutoPropagate: insert the current translation in all other occurrences of the same segment in the project file(s)
AutoCheck: check the translation for consistency with the TM and the termbase
AutoSend to Translation Memory: automatically send the translation of a segment to the TM when pressing Ctrl+DownArrow - AutoSearch
Enable AutoSearch: automatically searches for segment and portions of segment in TM and termbase
Display portions from Translation Memory: not only portions of segments found in the termbase but also those found in the TM are displayed in the AutoSearch window
Display all portions: displays larger portions as well as their subportions
Show sentences and portions in separate windows: splits AutoSearch window in two parts, one displaying only whole segments at the bottom of the DéjàVu Xwindow and another one displaying portions from TM and termbase on the right hand side of the window below the File Navigator window
Hide column header: the column header in the AutoSearch windows containing the source and target language names can be displayed or hidden
- After having selected the settings in both the General and the Environment tab, click OK and you start translating. Click in the target cell of the first segment - since we have just selected the AutoAssemble option and nothing was found for the first segment in the termbase (the TM is still empty) the text of the source segment is inserted in the target cell and can be replaced by the correct translation. After having translated a segment, press Ctrl + DownArrow which brings you to the next segment, again the source text is inserted and can be replaced. Every time you confirm a translation in this way the small column between source and target segment is changed to
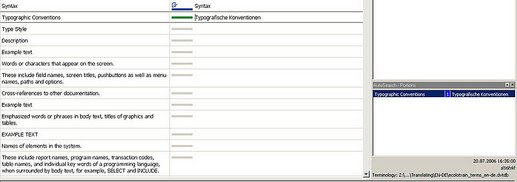
 which means that DéjàVu X tried to assemble this translation and that the translation is now "finished". When you reach the first segment for which DéjàVu X finds a translation in the termbase, the AutoSearch - Portions window will show this translation with a number on a blue background between source and target term (blue means: portion found in termbase). Since we enabled AutoAssemble, the translation is automatically inserted in the target segment, marked with a green line between source and target, which means that this was 100% match in the termbase. You can confirm this translation using Ctrl + DownArrow and go to the next segment.
 - The translated segment will again be marked as finished. In your translation, it may happen that the AutoCheck option seems to find an "inconsistent" translation, which does not correspond to the translation for a term listed in the termbase. In this case, the source word for which DéjàVu Xpretends to have found an inconsistent translation is highlighted in red and a red exclamation mark is shown between the source and the target segments. If you point with your mouse on the exclamation mark a quick info appears telling you where the inconsistency has been found.
- Check the translation and, if you think it is OK, just confirm it again using Ctrl + DownArrow.
- During translation process you will meet sentences containing "embedded codes", i.e. codes which are placeholders for some formatting codes in the original text. In DéjàVu X these codes are always displayed as numbers in curly brackets, e.g. {1} throughout the whole text. In DéjàVu X you are not allowed to change or delete these codes, you cannot change the order of these codes. If a code is accidentally deleted, a warning symbol (
 ) is displayed between the source and the target segments, as soon as you leave the segment using Ctrl + DownArrow. In this case, copy the code using normal Windows copy techniques from the source segment to the correct location in the target segment. Press Ctrl + DownArrow again and the warning symbol disappears.
- You will also see segments with a light blue bar between the source and the target segments. These are segments where the translation has been auto-propagated after the segment was translated for the first time in the project. If the translation is also correct in this context, you can confirm it using Ctrl + DownArrow.
- During your translation process you might want to add source and target terms to your termbase, in order to make them available for other translation projects, too.
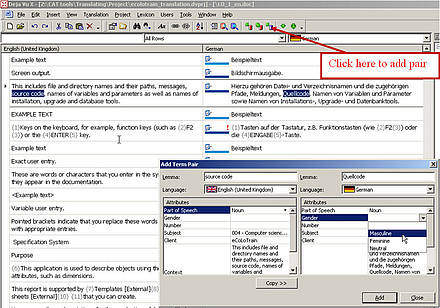
To add a new pair of source and target terms to your termbase, highlight both terms in the source and target segment and click on the Add Pair to Terminology Database button (
) in the toolbar. In the dialog box which opens you see the two terms together with the corresponding segment as Context. You can specify further information like Part of Speech, Gender etc. and then click on Add to send the entry to the termbase.
- Go on with your translation as far as you want. If you want to finish translating, just choose the Option Close from the File menu in DéjàVu X.


